Wednesday, November 27, 2013

Thanksgiving Goodies

Oh how I have neglected you blog, but I am back and with a vengeance.  With Thanksgiving festivities upon us and once again spending it with Chris' maternal side of the family, I find myself wanting to make something different than years prior.  Unbeknownst to me, I was apparently bringing a pumpkin pie; I am not crazy about pumpkin pie so I would not make it, and we ended up buying a really nice one from HEB (LOL).  

I had just received my two latest issues of Taste of Home and Cooking Light and had my eyes on some of the holiday pies shown.  Much to my amusement, Chris' stepdad, Mark, was all up for me making a chocolatey pie so Gingered Almond Truffle Tart it is!

I did not tweak anything in this recipe and made as is.  If there's something I feel could have been done differently or flavors that would have enhanced the tart, then I will tweak and update this post.  

You will need a 9-inch fluted tart pan; I bought mine from Sur la Table; however, mine is a 9.5 inch which is not a tremendous issue.  I think it works out better so your filling is not overflowing and leaves a nice, clean edge to your slices.  Another item that you will need is a food processor.

Ingredients:

1 cup heavy whipping cream
2 Tbs minced fresh ginger root
1 cup all-purpose flour
1/2 cup chopped almonds
1/2 cup confectioners' sugar
1/3 cup baking cocoa
6 Tbs cold butter, cubed
1/2 cup amaretto, divided
8 oz bittersweet chocolate, chopped
1/2 cup butter, softened


Preheat oven to 350 degrees.  In a small heavy saucepan, heat cream and ginger until bubbles form around sides.  Remove from heat.

Place flour, almonds, confectioners' sugar and cocoa in a food processor; pulse until blended.  


Add cold butter; pulse until butter is the size of peas.  


While pulsing, add 1/4 cup of amaretto to form moist crumbs.  


Press onto bottom and up sides of an ungreased 9-in fluted tart pan with removable bottom.  


Bake 13-16 min or until set.  Cool on a wire rack.


Place chocolate in a small bowl.  


Bring gingered cream just to a boil.  Strain through a fine-mesh strainer over chocolate; discard ginger.  Stir chocolate mixture with a whisk until smooth; stir in softened butter and remaining amaretto until blended.  


Pour into cooled crust.  Refrigerate, covered, at least 2 hours or until set.


This size tart pan was perfect leaving about 1/2 inch space for the crust/edge.

Due to the richness of this dish, thin slices are highly recommended yielding 16 servings per tart.

Recipe from Taste of Home Dec 2013 issue.


Chilled end result.

Tomorrow morning, I am tackling Cheddar Chive Biscuits before we head out so they can be slightly warm.

Until next time, Happy Eating!


Monday, September 23, 2013

Have Your Pasta and Eat It Too!!!!!!!!!

Please forgive me for having strayed for a while now; this does not mean that I have not been cooking up a storm, rather I just haven't had time to post anything as life just seems to happen.

So I have found a great recipe from Oxmoor House called Mexican Bow-Tie Pasta with Chicken.  When I ran the numbers through my recipe analyzer, I was floored!  I knew that I could make it way better, or rather healthier, while still preserving the flavor.  So I started manipulating and calculating until I came up with the perfect ingredients, which brings me to tonight's current blog.

Ingredients:

1 lb Barilla Farfalle, uncooked
1 1/2 lbs  Simple Truth - Natural Chicken Breast Boneless Skinless
2 Tbs Land O Lakes Spreadable - Light Butter With Canola Oil
2 cloves garlic, crushed
1/4 cup all-purpose flour
1/2 cup Central Market 2% Milk
1 cup Kitchen Basics Chicken Stock
1 cup Red Gold Mild Diced Tomatoes & Green Chilies
8 oz pkg Philadelphia - Fat Free Cream Cheese, cubed
2 Tbs Chives, chopped


Preparation:

Cook pasta in boiling salted water according to package directions. Drain and set aside.

Meanwhile, cut chicken into bite-size pieces. You may be wondering about this Simple Truth Natural Chicken; I found this as Kroger, and it's not super expensive plus the nutritional value is excellent.  

Melt butter in a large skillet over medium heat. Add chicken; cook, stirring, 4 to 5 minutes. Add garlic and continue to cook until chicken is just cooked through. 


Stir in flour; slowly pour in milk and stock, stirring constantly. Add Red Gold Tomatoes & Chilies and cream cheese and stir until sauce is hot and bubbling, and cream cheese is melted and smooth.


Add drained pasta to skillet; stir until pasta is coated with sauce and everything is well combined. 


Top with chives.


Serve immediately.

This recipe is enough for 6 servings.  It was a great hit in our household; it has a really great flavor even without adding any extra salt to it.  It is creamy, rich, has a slight bite and is not bad for you either so you can go ahead and enjoy this pasta dish.

Calories:  482
Fat:  5
Sat. Fat:  1
Cholesterol:  75
Sodium:  565
Carbs:  62
Fiber:  3
Sugar:  6
Protein:  43

I know you're probably looking at the carbs and thinking it is too high, but it is not.  You're allotted 0.15 carbs per calorie; based on the calculation, you are allowed 72.3 carbs per serving so this recipe comes under even on that point!

I will warn you that changing any aspect of this recipe, will change all the numbers.  One important thing to look out for is Sodium.  The chicken stock I use has MUCH less sodium than the intended chicken broth; I'm talking half!  So if you're looking at tweaking it in anyway (to fit what items you have in your household) and want to see how the numbers may change, run it through My Fitness Pal recipe calculator.

Hope this serves as helpful and that you enjoy it as much as we did.  I promise to not stay away for such long periods of time.

Until next time, Happy Eating!!


Friday, July 26, 2013

Pork Chops with Onion Peach Marmalade

So this night I decided I was going to make pork chops; when I decide to buy a pack of pork chops, I always lean toward center cut thick chops.  I recently got into brining & absolutely love what it does to my meat so I decided I would try brining my chops.  I also knew that I did not want your ordinary, run-of-the-mill pork chops; I wanted something different.

BRINE:

1/2 cup kosher salt
1/2 cup packed light brown sugar
1 sprig fresh rosemary
2 tsp black peppercorns
7 cups water
Ice


Trust me the salt does not affect the taste of your meat ever and will not make it salty; I promise.  In a large pot, bring 7 cups water to a boil. Remove from heat and add salt, brown sugar, rosemary sprig, and peppercorns; stir until salt and sugar are dissolved. Add ice cubes and chill until cold; I used 2 cups of ice to chill it down. Place pork in brine and set a plate on top to keep meat completely submerged. Cover with a lid or plastic wrap and chill overnight.


Make sure the pork chops are emerged and do not rise out of the water

Ingredients:

1 tsp. chopped fresh rosemary
1-1/4 tsp salt
1/2 tsp black peppercorns
2 bone-in center-cut pork chops
2 Tbs extra virgin olive oil
2 cups sliced white onions (1 lg onion)
1 cups chopped peeled peaches (approx 1-1/2 peaches)
1/3 cup sugar
3 Tbs sherry vinegar
1/2 ts fresh cracked pepper
1/4 tsp ground sage


Sherry vinegar is really hard to find, or at least it was for me.  I actually finally found it at Central Market.  I will warn you that it is a bit pricey, but it is a nice size bottle and has a wonderful flavor so it is worth ever penny. 


Preparation:


Heat 1 Tbs oil in a large frying pan over medium heat. Add onions and cook, stirring often, until transparent and start to caramelize, about 10-15 mins. Reduce heat to low; add peaches, sugar, vinegar, and peppercorns. 


Cook, stirring often, until everything is caramelized and sticky, about 40-50 minutes; I used the back of my plastic measuring cup to mash all my peaches to make more like a marmalade.  Stir in 1 tsp. salt and rosemary; set aside.


Heat remaining Tbs of oil in saute pan over medium high heat until the oil just begins to smoke.  Remove pork from brine and pat dry.


They even have a nice "seasoned" color after brining

Season both sides with 1/4 tsp salt, fresh cracked pepper & ground sage.  Add to hot pan and cook for about 7-8 min to form a nice golden crust, flip and cook for another 7-8 for medium well chops.  If you like your pork chops on the medium rare side, cook about 5 min on each side. 


***HOWEVER if you like a well done pork chop, I would cook for approx 20 min today since these chops are really thick.  Cook for approx 6 min, then flip and cook for another 6 min.  Reduce the heat to just below medium and continue cooking for another 4-6 min, flip once more and cook for another 4-6 min.  Reducing the heat will ensure you do not char or burn your chop nor dry it out***


The difference a great quality stainless steel pan makes!  

Transfer pork to a platter, tent with foil, and let rest 5 to 10 minutes. 


I served this with saffron rice and some kale salad with cranberries, pepita seeds & almonds; they all complimented the pork chops wonderfully.  The pork chops were cooked perfectly and were extremely succulent and flavorful.  The peaches complimented the pork in such a way that our taste buds were dancing around in our mouths, lol!  Christopher even told me that I was not allowed to ever make pork chops in any fashion with brining them first!  Matter of fact, the pork chops brined for nearly 24 hrs; I think the longer, the better.


I hope you will give this dish a try and that is as huge a success as it was in our household!


Until next time, Happy Eating!!


Sunday, July 14, 2013

Mussels With a Twist

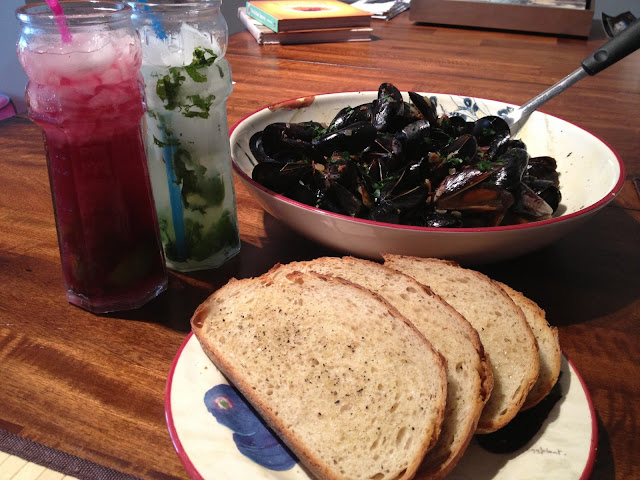
So today finds me wanting to try out a new way of cooking up mussels than the usual wine & herbs steaming method.  Friday night on our way to Chris' boilermaker meeting, we stopped by the store so I could pick up some reading  materials to keep me occupied.  I happened to be drawn to a magazine called Cuisine Tonight For Two; I was like, "Wow, really? I have to get this."  The magazine is separated in four sections: poultry, seafood, meat & vegetarian.  I found a rather interesting recipe for Apple Cider Mussels which I slightly tweaked to my liking and to ingredients I had here at home.  I will post the original recipe and then my tweaks.

Ingredients:

2 cups apple cider
2 strips thick-sliced bacon, cut into strips
1/4 cup sliced shallots
4 tsp chopped fresh thyme, divided
1 cup dry white wine
2 lb mussels, rinsed & debearded
2 Tbs heavy cream
Salt & Pepper

Preparation:

Reduce apple cider in a large sauté pan over high heat to about 3 Tbs, 17-20 min. Transfer reduction to a bowl coated with nonstick spray.

Cook bacon in another large sauté pan.  Transfer bacon to a paper-towel-lined plate.  Drain all but 1 Tbs drippings from pan.

Sweat shallots and 3 tsp thyme in same pan in drippings over medium heat until softened, 1-2 min.  Whisk in wine & cider reduction and season with salt & pepper.  Add mussels, increase heat to high, and cover with a tight-fitting lid until mussels open, 3 min.  Discard any mussels that don't open.  Spoon mussels from the broth into two serving bowls. 

Stir in cream, remaining 1 tsp thyme, and bacon into broth, then pour over the two bowls of mussels.

This recipe also calls for the following as an accompaniment to the mussels:

Salami & Apple Dippers

Ingredients:

2 slices Gruyere cheese, halved
2 slices hard salami
4 slices Pink Lady apple
4 slices baguette (1/2-inch thick)
1 Tbs unsalted butter, melted

Preparation:

Layer a quarter of the cheese, half the salami, half the apple and another quarter of the cheese onto each of 2 baguette slices.  Top with remaining baguette slices to form sandwiches.

Brush the outsides of the sandwiches with melted butter.  Cook sandwiches in a cast-iron skillet over medium heat, covered, until golden brown on both sides, 5-8 minutes.


My version:


Ingredients:

2 cups apple cider
3 strips center-cut bacon
1/4 cup chopped shallots
4 tsp chopped fresh thyme
2.3 cup dry white wine
1/3 cup seafood stock
1 tsp extra-virgin olive oil
2 lb mussels, rinsed & debearded
2 Tbs heavy cream
1 Tbs chopped parsley
1 tsp salt
1/2 tsp fresh cracked pepper


As I stated earlier, I tweaked it a bit to my preference and what I had on hand. I do not like wine so I cut down the wine and added seafood stock which I always keep in the pantry and fridge.  Also I used 3 slices of center-cut bacon because it is mainly meat and lots of the fatty ends are cut off; additionally since it did not render enough drippings, I added extra virgin olive oil to make up for it.

Preparation:


Reduce apple cider in a sauce pan over high heat to about 3 Tbs; this actually took just over 25 minutes to get thick and syrupy.  Transfer reduction to a bowl coated with nonstick spray.


Cook bacon in a sauté pan.  Transfer bacon to a paper-towel-lined plate; chop once cooled.

Add olive oil to drippings & sauté shallots and 3 tsp thyme over medium heat until slightly caramelized, about 4 min.


Whisk in wine, stock & cider reduction and season with salt & pepper.  Add mussels, increase heat to high, and cover with a tight-fitting lid.


Until the mussels open, about 3 min.


Discard any mussels that don't open.  Spoon mussels from the broth into a large pasta bowl.

Stir in cream, remaining 1 tsp thyme, and bacon into broth.


Pour over the mussels.  Sprinkle with chopped parsley.


I did not understand the need of making the "dippers" to go along with the mussels.  I found a great tasting loaf of fresh Buttermilk Sourdough Bread while at Central Market this morning when I went to buy the mussels.  I simply brushed one side with extra virgin olive oil and sprinkled lightly with salt & fresh cracked pepper and baked in a 350 degree oven for about 5 min until toasted.  This served as a great vehicle for soaking up the magnificent broth.

I also made Mojitos which Chris & I both think complimented our lunch perfectly.

Wanna make a Mojito? 

Ingredients for 1 Mojito:

10 mint leaves
2 Tbs sugar
1/2 lime, quartered
1.5 oz Bacardi Rum
Mineral water, like Topo Chico
Ice

Preparation:

Add mint leaves and 1/4 lime to a sturdy glass and muddle well in order for the mint leaves to release its oils and break down with the lime.  Add the sugar and 2 more lime quarters; muddle well.  Fill glass with ice, add rum and top with mineral water; stir well.  Top the rim with remaining lime quarter.

**Note**

I like flavored Mojitos and have found that Naked's Pomegranate Blueberry Juice works perfectly for my Mojito.  After I add the rum, I add about 1.5 oz of juice, and then top off with the mineral water.  Super yummy!!


Lunch was great, and there were definitely NO leftovers.  You will certainly be surprised by the flavors in this dish, and I promise that the apple cider syrup does NOT overpower this dish; it is actually subtle and ties the dish together. 

I hope that you give this dish a try and that it is a hit in your household as well.  I can only imagine how good this would be with clams; hmmmm......something to try next time!

Until next time, Happy Eating!!

Sunday, July 7, 2013

Sunday Brunch Idea

In attempting to do something different for breakfast than the usual eggs & bacon routine that seems to be common but not common for me, I did some research yesterday on the net and even pulled out a few of my recipe books in hopes of finding something interesting and different. 

Ok, so Arroz Con Leche, loosely translated as rice with milk, is rice pudding.  Rice pudding?  How is that supposed to interesting, right?  Well this is a Baked Rice Pudding.  I found it in one of my cookbooks, Breakfast Heaven, which I had found by accident at Barnes & Noble for what seemed like a steal.  I, of course, made some changes to it (I wouldn't be me if I didn't); the preparation & baking time, however, stay the same.  First I will post the original recipe, then mine will follow:

Original

Ingredients:

5 Tbsp short-grain rice
3 Tbsp brown sugar or 2 Tbsp agave syrup
1 strip lemon zest or 1 vanilla pod
4-1/2 cups whole milk
1/4 tsp grated nutmeg
2 Tbsp butter


Preheat oven to 300 degrees.  Generously butter a 1 qt ovenproof dish.

Put the rice, brown sugar or syrup and lemon zest or vanilla pod in the dish.  Gently pour in the milk and stir.  Sprinkle with the grated nutmeg over the surface of the milk and dot with butter.


Carefully transfer to the oven and bake for 45 minutes, stir


Let cook for another 75 minutes by which time a brown crust will have formed and the rice will be fully cooked.  Served hot or cold.

Makes 6 servings.


My Version

5 Tbsp Arborio rice
3 Tbsp light brown sugar
1 strip lemon zest
1/2 tsp vanilla
4-1/2 cups 2% milk
1/4 tsp freshly grated nutmeg
2 cardamom pods, gently crushed, 
1/8 tsp ground ginger
1 cinnamon stick
2 Tbsp reduced fat butter (I prefer Kerrygold Irish Butter)


As previously stated the prep is the pretty much the same with the exception of putting the additional ingredients as follows:

Put the rice, brown sugar, lemon zest, vanilla, ginger & cardamon pods in the dish.  Gently pour in the milk and stir.  Sprinkle with the grated nutmeg over the surface of the milk, put the cinnamon stick in the middle and dot with butter.


Let me share with you that Chris and I both enjoy exotic flavors, hence the cardamom and ginger tweaks.  It is not a secret that I am a huge fan of HEB; I absolutely love the wall of spiced they have (I should take a pic one day of this).  You can go there, grab a baggie, grab a spice jar and fill it up as much as you want; then you put it on the scale, enter the code on the jar & print out your price tag.  This is so much more economical than buying the jars on the shelves; trust me, this is way cheaper!  I have picked up so many different spices, which was especially convenient for me when I made phở.  I have cinnamon sticks, fennel seeds, cardamon pods, ground cardamom, cream of tartar, all kinds of exotic salts, star anise and the list goes on and on!


Lucky for me, I have this handy dandy beautiful glass jar from Teavana, of which we are huge fans of as well; this jar is practically free when you buy the jar of their German Rock Sugar.  I was making trips to Teavana quite frequently for the girls at my last job to pick up orders and ended up with a few of these jars; I gave some away and wondered what I was going to do with the ones I had.  So, I filled one up with rice and this one has served well as a spice jar.  But I digress..

Here is the finished product:


I can see where adding 1 cup of raisins or dried cranberries or currants or any dried fruit before baking would add a delightful addition to this dish.  Hope you enjoy it as much as we did and I baking it.

Until next time, Happy Eating!

Wednesday, June 26, 2013

No Ordinary Pot Roast

(playing catch up!)

Ahhhh, pot roast, what can I say?  I have never really like it due mainly to the fact that I do not really like beef enough to want to eat it.  Growing up we had pot roast a few times, and I can remember not being to keen on it because it was always so basic: salt, pepper, onions.  Living on my own has expanded my mind in regards to herbs, spices, veggies, meats, etc...  I found out that I crave seasonings and herbs rather than the regular salt and pepper; additionally, I don't want just plain salt or plain ole pepper.  I like kosher salts, sea salts or flavored salts and all kinds of whole peppercorns and mixes to freshly crack on   my own: the spicier, the better!

After 20+ years of cooking, learning, researching and tasting, I decided it was time for me to come up with the ultimate pot roast experience.  I crave juicy, tender meat with earthy and slightly sweet flavors and a nice sauce; this is what I came up with (let me add that a Dutch oven is the best creation on the face of the planet for this):


2-1/2 lb pot roast
3 carrots, peeled & quartered
3 leeks, sliced
1 onion, halved & sliced
8 garlic cloves
2 shallots, sliced
½ lb baby Yukon potatoes, quartered
¾ cup red wine
2 cups water
2 tsp Better Than Bouillon Beef Base
2 bay leaves
2 tsp chopped rosemary
Kosher Salt & fresh cracked pepper (enough to sprinkle all over the meat)

Preparation:

First, let's talk about stock:  I opted to use my Better Than Bouillon beef base because I feel it has a richer flavor profile which I was thinking would help pull my pot roast together (and I was right).


When dealing with leeks, know that they are filled with dirt and grit so after you slice them, throw them into a colander sitting in a bowl and fill with water.  Run your hand a few times through the leeks, and leave them while you prep your veggies.


Chop and prep your veggies.


Pull the colander out of the water; you will notice all the dirt has settled in the bowl below. (dirt in bowl good, not in food, lol)

Pat the roast dry with paper towels.  Cut several pockets into the roast (stab it, lol) and put a garlic clove in each pocket.


Use a thick-bottomed, oven-proof covered pot, such as a dutch oven, just large enough to hold roast and vegetables. Heat 2 Tbsp of oil on medium high heat (hot enough to sear the meat). Sprinkle and rub salt, pepper, and rosemary all over the meat. Brown roast in pot, all over, several minutes on each side. Don't move the roast while a side is browning, or it won't brown well.

When roast is browned, remove from pan and set on a plate. Add the onions, leeks, shallots & carrots to the pan and cook for about 5 to 10 minutes, until they begin to brown.  


Add the potatoes, red wine, beef base & water; stir well to combine.  Add the bay leaves.  Set the roast on top of the veggies.  Cover. 

Bring to simmer and then adjust the heat down to the lowest heat possible to maintain a low simmer when covered, then put in the oven: start the temp at 300°F for 15 minutes, then drop it to 225°F.

Cook for 4 to 4-1/2 hours, or longer, until meat is tender. 


***NOTE***  to thicken up the sauce a bit, take equal parts of cornstarch to equal parts of cold water; dissolve well, and mix into the liquid.  Simmer on the stovetop about 2-3 min for the activate the thickening agent in the cornstarch.  I would suggest to start with 1 tsp first and add more later to achieve your desired consistency.

The pot roast was an utter success: the mean totally fell apart and was so incredibly tender and juicy.  It had such an amazing flavor, and the sauce was perfect over the meat.  I think we ate this for 3 days, and it was even better (if you can believe that) the second time around.

I served this with peas, but it will go good with rice or a nice salad as well.

Ok, I am proud to have finally gotten my blog caught up; I hope you enjoy this as much as we did.

Until next time, Happy Eating!